Friday, September 28, 2012

New outlook

My last Salvation Army "art" refresh is a mirror.  Who can't use another mirror?
Remember this old girl?

 Dried flowers and broken glass.  Poor thing needed a new home.  Someone to appreciate her.  Maybe that is what Amanda Bynes needs too?  What has happened to our sweet little Holly?!  Home girl has gone crazy.  For $5.25 I was willing to see what I could do with her.
Spray paint primer=best invention ever.  Then brushed on some already owned blue/aqua paint!
 Scrap book paper and modpodge!  I love scrapbook paper.  So many options.  Keeps the painting and stenciling to a minimum.  I like keeping a (should be) easy project on the easy train.
 Duck taped some cardboard to the back of the mirror to keep it a little more stable than it was.
 Ta-Da $5.25 and Amanda looks like a new girl.  Too bad it's not that easy for Amanda in real life.

Another (almost) free refresh!  On Monday I will show you the whole shebang together and a final cost for a house full o' art.

Thursday, September 27, 2012

Where's the Beach?

More beach house art.  I told you I was filling this house with new art.  Well at least seeing what I could do in 1 week.

When searching for artwork and ideas for the beach house I found this image on Pinterest, but originally from here:

I love the blues, love the letters (I'm from the south, we'll put letters or a monogram on anything that stays still long enough), and the worn wood look.  I wasn't really sure how to recreate it without buying anything.  My goal has been big impact low cost.  Isn't everybodys?

I got the letters at Michaels ($1.49ea) They were the cheapest letters they had.  I was using my coupon for the canvases and they don't let you use more than 1.  Boo.

I had a piece of 1/4" luan board and blue paint.  I wanted to make it small so that it could fit almost anywhere in the house.  Even above a door jam or window.

                                                  Here is where I started (what I had):

 I cut the wood (yup, used the jig saw mom!) and sanded down the rough edges.  Gave it a quick coat of Sherwin-Williams Blue Reef (trying not to add too many different shades of "sea")  Same color I used on the calendar canvases.
                                                         Primed & painted the letters:

Then I used some brown Sherwin-Williams paint to age/distress the letters and arrow.
                                                Hot glued the letters on and...

Stapled some twine to the back to hang it from.  Easy peasy $7.50.  You couldn't buy this sign for anywhere near $30 in a gift store at the beach!  I still have 2 sets of art to finish...mom comes today for the pick up!

Linking up with Coastal Charm , A2Z,  Savvy Southern Style, The Thrifty HomeHouse of Hepworths, & Tatertots & Jello

Wednesday, September 26, 2012

One Word Wednesday

                                                                    Art

Monday, September 24, 2012

Beach House needs Beach Glass

This is by far the easiest project I have ever done.  I can't believe I am going to give you a post dedicated to just this.  But I am.  Because I don't feel well.  So it happens to be a great day for this post!

Remember this little frame trio?  $1.29  Perfect for a house at the beach!  But it's boring.
 I was just going to add some cute scrapbook paper, but that would have made this little project way too easy.  Like Kristen Stewart easy.  My mother who swears she doesn't have a creative bone in her body (but so totally does!!) wanted to use sea glass.  Which sounded great but didn't want to buy a bag for 3 pieces.  This is wear those "Craft drawers/bins" in your house can come in handy!  I happened to have some. I had some burlap, that I cute to fit the backing.  I used spray adhesive to keep it in place.  Threw away the plastic photo cover.  Put the burlap covered backing back in the frame.  Broke out the glue gun.....
 and hot glued some glass to the burlap!  Super easy.  Super cheap ($1.29)!  (I think) it's super cute.  Definitely beachy!  Exactly what we were looking for!
 It's also small enough that you can find a place for it.  It can go anywhere.
I believe that may be the easiest and cheapest project I've ever done.  That is what I would call a successful refreshrepurpose!

Weekend Wrap Up-Artwork

I promised you (well at least I promised my gma & mom) on Friday some completed artwork today.

Big wall, over the couch art.  6+sq ft for $12.00.  It is super hard to find over the couch art.  I know this because I am currently looking for some!  I find it all so...so...expected.

So here is some that is hopefully unexpected and won't break the bank.
What you need: 6 12x12 canvas (7 pack from Michaels $19.99-40% off coupon= $12), 1 old calendar, 1 pail sample paint (Sherwin-Williams Blue Reef), spray adhesive, and mod podge.  Of course you will need a paint brush or 2 and if you are lucky like me you'll get help from a super cute 3yo assistant!

The calendar I used was from 2000.  There wasn't much on it.  Except my first & only Bay to Breakers,  my interview in Boston, my brothers wedding, & my last day in San Fran.  It was a good year!  The calendar is a staple gift every year (thanks Nina).  12 months of beautiful artwork and yummy recipes (of which I have only tried a few?!)
 If you can find some conch, here is a recipe for conch burgers!  Mmmmmm (But really, I love the colors on this month)


After trimming off the white edges, we (my assistant & I) painted the edges of 9 canvases (3 will go elsewhere, but 9 would be a great number to use over your couch as well, giving you more artwork for only a few dollars more!)  We painted them with that sample paint I had from another project.

After that dried, I sprayed the backs of the calendar with some spray adhesive (already owned!) and applied them to the canvas.  It takes a few minutes to stick so you have a little time to peel back if you don't like your placement!  I then flipped them over and added some pressure from the under side to make sure it was secure.

I let that dry and my final step was to add some mod podge (already owned but will have to be added to the next project budget since we are now out!) for a little protection!

And that is how you repurpose an old calendar full of beautiful pictures and get 6+ (add spaces between the canvas) sq ft of over the couch art!  Easy!

What do you do with your old calendars?

Linking up with Coastal Charm , A2Z, & Savvy Southern Style

Friday, September 21, 2012

SCORE! Part 2

I told you yesterday about my shopping scores this week.

Yes, I was supposed to be working on my roman shade for the half bath, but my mom needed me to create a bunch of artwork for my grandmothers beach house.  I was so excited thinking of all the possibilities until she threw the B word at me.  You know the one.  Budget.  Booooo.  But I like a challenge.  However, this challenge was two part.  She needs it all by Wednesday.  That's right.  One week.

First I scoured all my Pinterest boards.  The art & printables one is where I started.  This was going to be tricky for a house I've only spent a few hours in.  I could not remember a thing about what was there (walls or art!)  I created a board just for this house so I could keep my thoughts organized.  I should tell you that this is going to be a rental so nothing too fancy and if it got broken it wasn't a huge loss.  It will also be dog friendly.

I made a list of things I wanted to do and supplies I would need.  Grabbed my Michaels coupons and left my mom with the babes!

I stopped at Salvation Army first.  Just to check in and see what I could find.  Here is my loot:
2 big matching frames (always a score in itself, in my opinion!) 1 mirror (another score in itself, only because I think it's hard to find either of these items!) 2 4x6 frames 1 5x7 and one triple frame in white wood and connected by rope...very beachy already!
Since I was there and shopping ALONE I had to look around.  That is when I found this:
No, I don't need it, but I thought it was too cute..well, it could be.  I also had one person in mind. I've already committed to doing her nursery when it's time!  I think this will be perfect.

Ok, back to artwork...I then went to Michaels to finish getting my supplies.  They had a great coupon for canvas packs (40% off each canvas purchase...NOT just one!!)!!  Super, because I needed 12x12 and I needed 9.  I got 2 seven packs ($19.99 each +coupon).
 They also had 11x14 frames in the clearance section for $6, I needed 3.  11x14 already matted!  Score!
Next week I will fill you in on all things ART!  Like how I am going to make 6+sqft of artwork for less than $19.99!

Thursday, September 20, 2012

SCORE!

This week has been bargain week! Sorry, if you are still waiting on those roman shades, I've been too busy shopping!

It started at The Clothesline a consignment sale here in Richmond. After visiting the last kids sale in March (my first ever consignment sale) to say it was a little hectic would be an understatement, I decided I should purge some of our stuff.

Since I consigned I got to shop early! I scored big with lots of good stuff but this took the cake:

$28.50 ladies!  $28.50!!!!  That long sleeved smocked Christmas dress would cost double that new.  Don't even get me started on what that Burberry dress would cost new!!  I love dresses.  I really love little girl dress.  And I have a weakness for Burberry.  Bummer for the hubs (who actually might have a little crush of his own on that tan plaid print).  However, I worked in the apparel industry way too long (and I almost went to work for them!).  I know pretty close to how much that dress cost to make, and it wasn't close to $145!  I just can't justify it for a babe.  And I may or may not have bought something in a size 3.  What can I say? I love a deal and quality clothes.  Combine them and I get all giddy and make a phone call to squeal with a girlfriend the minute I get in my car  I am totally excited!

I scored again today at Salvation Army & Michaels!  But that is a post of it's own!

Friday, September 14, 2012

Baby Legs

While I am keeping you on pins and needles waiting to see that roman shade, I will share some pictures from a new project. It should probably go on my family blog, and it might at some point, but will never make it there, due to the cuteness that keeps me away from the computer.

So here is cuteness now. Little Miss enjoying her most recent repurpose which I first shared a sneak peek of here:


She is trying to crawl and I don't want those beautiful yummy delicious little knees getting banged up. Not to mention that most of our floors are hardwood....ouch!


I didn't use a tutorial. I pinned some on pinterest but found it easier to just go with the flow and use what sewing knowledge I have!

                                                          Knee socks from the store:
                                                              Cut off at the ankle:
Then snipped the toes and ankles off the foot part (these make the bottom cuff, not completely necessary, you could just fold and hem!)
                                                Flip the band part inside out and sew
(make sure the pattern, if you have one, will then be in the right direction!)
Then sew the hem on the bottom part of the cuff & iron. Flip right side out and enjoy your new baby leggings, or at least watching your little one enjoy them!  And that is how to repurpose knee socks!
And one last one of Little Miss, because the hair is too much..
That is all natural people. All nat-tur-rel!  Enjoy your weekend and all the cuteness that fills your house!

I'm linking up with Coastal Charm and Beth at A2Ztoday!

Monday, September 10, 2012

Window Inspiration

I have this window:
And it needs a little something. The bathroom oviously needed a little lot of something too. Don't worry, that got done. It's just taken months.

I even have the fabric already (a shower curtain from World Market.  I couldn't find actual fabric that I liked.  I wanted a little yellow and grey and I love the hint of blue grey too!)!
Serious cuteness, right?! I kind of like the fabric too! It will go in the laundry room too.  Both are off the playroom.
Therefore, I wanted the same fabric and I wanted it to (kind of) go with the playroom. It doesn't, but oh well, I liked it!

I tried to gather some inspiration for window treatments because I will be making something soon!

How come all the roman shades are inside the window frame? I like them outside. What are your thoughts...

Inside ala Martha
or outside like Alissa, (a smart blogger who wanted outside for extra height, like me, and gives you a most detailed tutorial, which means, I don't have too.  Win! Win!)

Come on, so which is it? Inside or Outside?

Friday, September 7, 2012

Weekend Reading

Oh boy Oh boy Oh boy!! Look what came in the mail today!! It's the adult version of getting the Sears Christmas catalog!

 I love to flip through. Front to back, back to front. And then I like to sit down and breathe in her (his?)beauty and all the lovely things. Then I go through and tear out pages and put them in a binder and make notes and take measurements....but now with Pinterest who needs that big bulky binder?!

 Maybe instead I will just pin them to a real bulletin board for every day inspiration, I could use some!
Is it bedtime for the kids yet?!

Monday, September 3, 2012

Dresser with a job

I gave you a sneak peek on a dresser I was working on here. My grandmother had this dresser in her basement and didn't need it anymore. She said it didn't work very well, so we thought we would keep it in our basement for tools and what not. Because we certainly didn't need another dresser...so my husband thinks.
Drawers
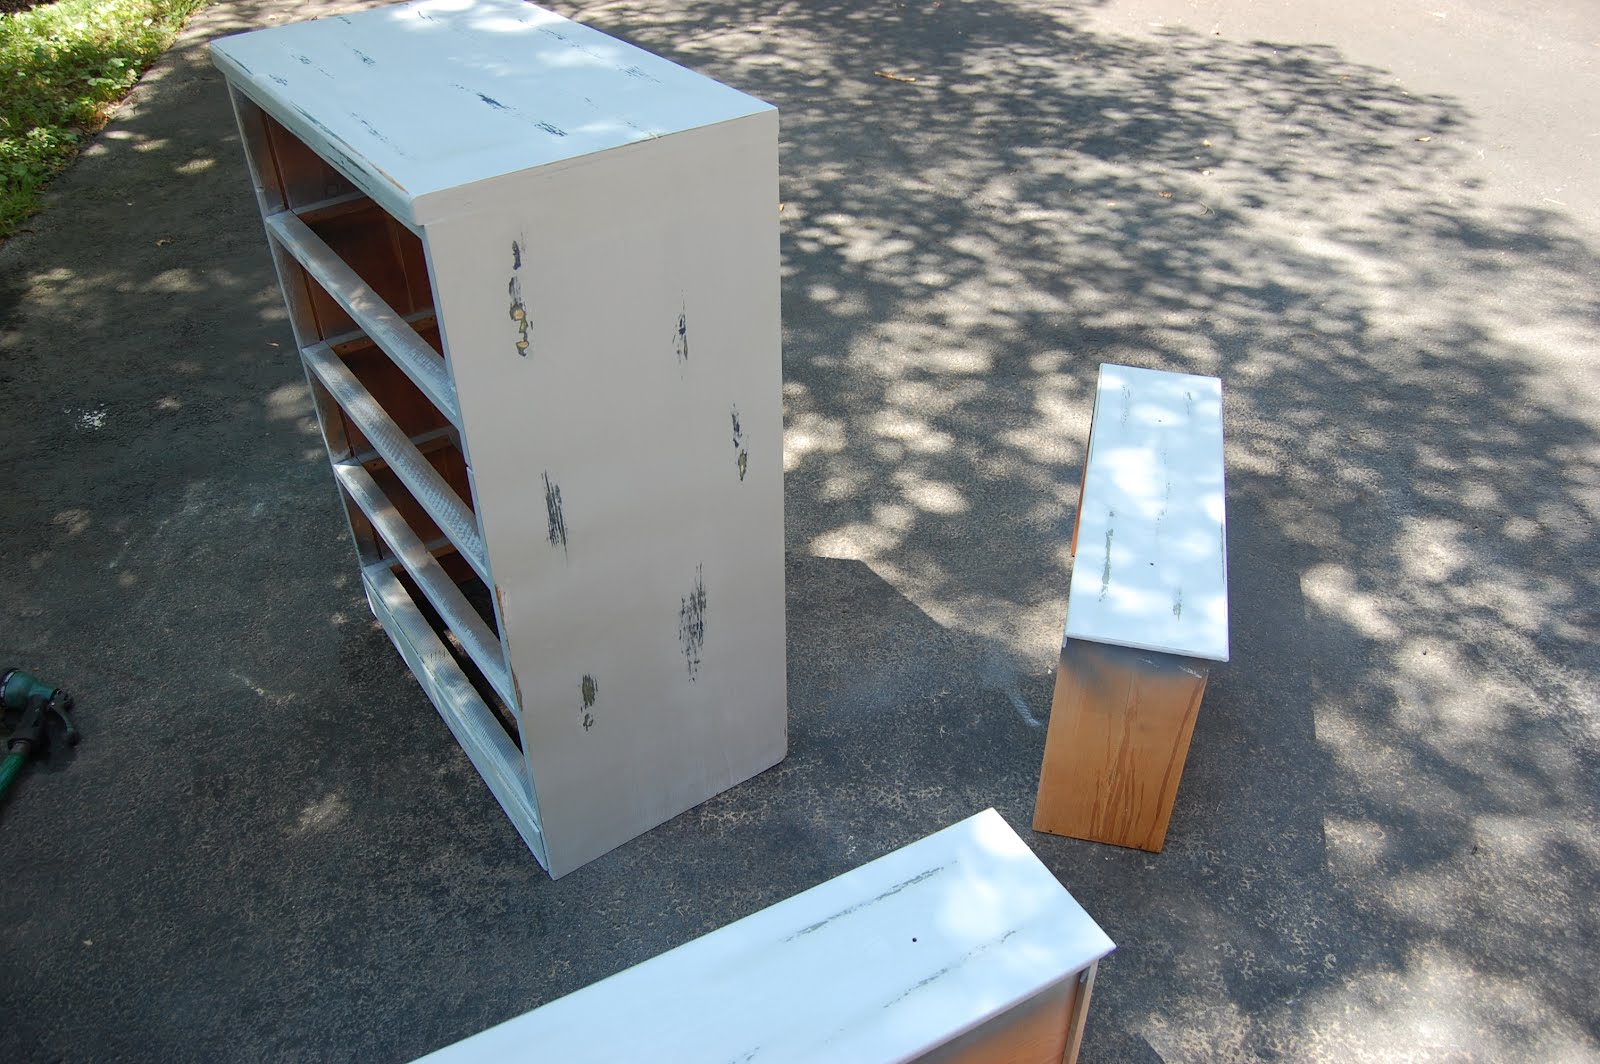
Then things changed in the bedroom. Eww, really, my mom reads this, get your mind out of the gutter. The hubs (who THOUGHT we didn't need another dresser, why oh why, were we going to keep this one?) got a flatscreen. The blue was not my color. And you know I couldn't leave it alone. So, I sanded
And, I actually liked what I was seeing...wood was painted green, was painted blue, so I was getting some great color and a little blue green mix! However, I kept going. I primed, because I believe in priming. (Almost) everything should be primed before painting.
I painted (I chose a nice neutral pale grey blue, since our master bedroom is still untouched, 1 year in!) I loved the paint. Valspar Ultra premiuim gloss, paint and primer in one. It was thick, went on SMOOTH, and was glossy but not TOO glossy. I really liked this paint and can't wait to use it on another project. This dresser was going to get lots of use, it needed to be glossy.
Then I didstressed it.
Hardware was the hardest part. I knew I wanted clear. I also knew that Hobby Lobby always has their knobs half off. I went to 2 different locations. Twice. They only had 1 knob....ugh...but I was excited to get this piece finished so I buckled and went to Home Depot. These knobs are nicer than the HL ones. Good thing because you can pay twice as much there!
The top
Ta-Da. Finally a new refresh! Which, I am sure, since we are "Refresh & Repurpose", that is what you were waiting for.
BUT....this dresser has a job....remember it was for the TV. It was the perfect size for the TV but not for the TV & the cable box.  Sooooooo.....
I pulled out the top drawer. Hubs cut the front off of the drawer itself and drilled 2 holes. One in the drawer and one in the back of the dresser (for cords). I attached the drawer front with two hinges. I also used a magnet so that it would stay shut, since those hinges will also get lots of use. I thought about painting the inside of that drawer for a fun pop of color, and I still might....one day. 

I don't know why I insisted on styling this for pics, because this is what she will look like in her daily life.
Or, if we are being totally honest, this:

 I love a Refresh & Repurpose. Hope you enjoyed as well! 

 I'm linking up with Beth at A2Z, as well as Coastal Charm, One Project Closer,  Savvy Southern StyleThe Thrifty HomeHouse of HepworthsMiss Mustard SeedTatertots & Jello, & Between Naps on the Porch. Check out some other great ideas!