Showing posts with label Babies. Show all posts

Tuesday, October 22, 2013

Two Roads diverged in a wood Part II

This is girly outdoor nursery is DEFINITELY the road less traveled.  I couldn't even find any inspiration on Pinterest?!

My next favorite place to start a project is fabric.  Sometimes I search for some that speaks to me and sometimes I hoard it until I find a use for it..like my living room curtains.  This was a search.  But I loved what I found...I really really love it.  It's called Yay Day by Birch Organics.  I can see I will be spending more time on their site...such fun stuff!
This would be the bedskirt.  I may or may not add a white or pale pink ruffle to it like the one in my nursery, or maybe pom poms to the edge?  However, I really like it as is.  I would leave it as is for covering a glider and I might even use some to cover the changing pad.

My curtains are from the same collection & they would definitely be getting pom poms!  I would also do a crib sheet and a lumbar pillow for the glider.
Here is what I've put together for a little miss that I feel is girly and outdoorsy.  Which I feel her mom has down to a science.  I used a lot of the same elements from the boy room.  Subtle Touch grey walls from Behr, dark crib and dresser/changing table.  I'm sure Pantone will be telling us that pink is the new green any day now...

And because I have to cover her walls (I would leave furniture lay out the same) I did a little work on those too.  Finding artwork was not difficult at all. 

Finding artwork was not nearly as difficult.  I love the animal hooks I found (had to have a dog!)..but thought about these three instead:
On her bookshelf I would add some fun adventure books like Pippi Longstocking, Violet the Pilot, and The Paperbag Princess. This night light would have to go on one of the shelves!

Let's face it:  There is nothing cuter than little girl clothes.  Here is what I would choose to start her closet:

I hope y'all enjoyed this girly outdoor nursery!  Can't wait to work on the actual nursery!  One last thing I thought was funny, besides me working on a "campy themed nursery"..I would have to add it somewhere, so she'd always think about her Auntie Jenn!


Monday, October 21, 2013

Two Roads diverged in a wood...

Some exciting news around my house is that some friends are having their first baby.  And while it is much too early to share their fantastic news..I was feeling inspired.  I'm so excited to have this new little baby in our life.  I cried when I was told and I've cried more than once since.

I picked a camping theme which I think fits my favorite outdoorsy couple...I loved doing this little boys nursery so much...and since we don't know the gender why not do a girl version (a lot more challenging for me)...check back tomorrow for that one!
Here are the basics:

I love the green touches, but I think orange would have looked really good too.  I think any bold fun colors would look great as accents...yellow and red would be my choice.

I also love finding things for the walls:  I'm a big fan of gallery walls even though the execution of hanging each piece is terrifying!  Here are babys walls:
Most items are from Etsy!
Yes, I would put the gallery wall over the crib and I did it my own home.  Not everything has to be glass and heavy (those are felt arrows!)!  A few extra nails and screws and you should be safe.  The Chicago print is not the actual city I would use for this couple, but I didn't want to use their real city..which is available in these great colors!  Those field guides were my favorite.

On the changing table (& dresser in one!) wall shelves I would probably put some old tins to hold q tips and diaper cream and some fun family pics.  I couldn't resist adding an animal head, plus I think it is tall enough to balance out the height of the shelves beside it.

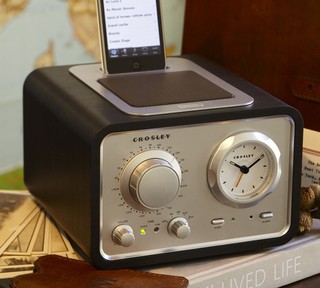
Every room needs a bookshelf and I would not only include books about Tom Sawyer, Huck Finn and Swiss Family Robinson, some more family pics (mom is quite the photographer), but also an iPod dock...I know, so 2014...but the iPod can play lullabies or white noise..but let's face it, with a newborn it's nice to know how often you are feeding that ferocious little bear with a clock (I know some people disagree).  I like this one from Houzz.  Kind of retro
Or this one that looks like a tree stump
From Shirwood Creations on Etsy
And since I'm a clothing girl, I couldn't resist hanging a few pieces in his virtual closet....

My friends did not give me any direction it was purely what I thought of when I thought of their baby.  That being said, this little nursery will more than likely not have any finished project pics, but whatever they choose will be fantastic I know!

Friday, September 14, 2012

Baby Legs

While I am keeping you on pins and needles waiting to see that roman shade, I will share some pictures from a new project. It should probably go on my family blog, and it might at some point, but will never make it there, due to the cuteness that keeps me away from the computer.

So here is cuteness now. Little Miss enjoying her most recent repurpose which I first shared a sneak peek of here:


She is trying to crawl and I don't want those beautiful yummy delicious little knees getting banged up. Not to mention that most of our floors are hardwood....ouch!


I didn't use a tutorial. I pinned some on pinterest but found it easier to just go with the flow and use what sewing knowledge I have!

                                                          Knee socks from the store:
                                                              Cut off at the ankle:
Then snipped the toes and ankles off the foot part (these make the bottom cuff, not completely necessary, you could just fold and hem!)
                                                Flip the band part inside out and sew
(make sure the pattern, if you have one, will then be in the right direction!)
Then sew the hem on the bottom part of the cuff & iron. Flip right side out and enjoy your new baby leggings, or at least watching your little one enjoy them!  And that is how to repurpose knee socks!
And one last one of Little Miss, because the hair is too much..
That is all natural people. All nat-tur-rel!  Enjoy your weekend and all the cuteness that fills your house!

I'm linking up with Coastal Charm and Beth at A2Ztoday!

Monday, August 20, 2012

"HI" Chair

This high chair was perfect for getting me on a furniture kick again.  It belonged to my father in law.  So needless to say it's not as safe as it needs to be for little miss but will be super fun for her and her baby dolls!
It took a good bit of time only because I'm working during naps. It got sanded, primed, painted, distressed, white circle, pink circle, monogram and a poly top coat via spray paint! I'm in love. I wish she could use it now. Here she is in a favorite dress (of mine) worn at the rehearsal dinner of a dear friend. I love the color combo and thought it would be perfect! The quality of the picture is awful (from my cell) sorry.
Primed
Painted
Distressed
Personalized
Perfection


I'm ready for some more projects! Thanks for waiting patiently!

Friday, January 20, 2012

Fit for a Princess

Here it is! The big reveal. The nursery.

Let's first look back at this space in September. A nice blank canvas.
I love this nursery. It is a smallish room, maybe 9x12? Maybe a little bit bigger maybe a little bit smaller.

We started with pink walls. Added in some natural linen, crisp white, and a few more touches of pink. I wanted it to be suttle and calming. I didn't want it to be too frilly or overdone. But I'll admit, I was a little excited about doing a girly space. Hence the pink walls!

Welcome to the nursery of our Little Miss
A small side table (desk)that holds some family pictures and a lamp. A framed (free) "Babies Don't Keep" printout from Lay Baby Lay. It is a nice reminder to keep rocking, keep holding, keep kissing that sweet new baby in my arms. A decent sized basket holds special blankets close at hand and makes them easy to grab. Don't you just want to lay in that basket...how comfy!
The crib (a crucial part of the nursery!) and that gallery wall. I'm so glad I faced my decorating fears and finished one! The hardest part was not finding items or prints it was finding it's perfect layout...and then..the measuring for the wall....ugh...
This is Honeycomb. Honeycomb is the bear the boys made her before her arrival. She has a voice box in her hand with a recording of my sweet boys telling her they love her. Don't worry, she's not sleeping in her crib yet, so she is not being harmed by the bear being in her crib.
Standing in the doorway this is what you see. The "cutesy" curtains, nice soft thick rug (which we used in our first apartment and have moved several times, knowing that one day we will use it again?!) I believe it was just a Home Depot find. The dresser is a piece I went back and forth on having out or using in the closet. It came down to function. With me, function wins almost every time. I needed a place for rocking neccessities (burp cloths, lip balm, water, books, music, light). So the dresser, although a bit big for the space, stayed.
In my first nursery, I did not want a glider. I wanted a nice big overstuffed chair that was comfy and squishy. I wanted to be able to reuse it somewhere else. That is, until I went to test drive them. I decided I'd rather have a traditional glider. I have come to love my glider. I have spent countless nights rocking, singing, crying, praying, laughing, worrying, tickling, nursing and loving on three small babes. It's going to be hard to part with. The blanket on the back is one my great grandmother made me when I was a wee babe. It's a nice reminder of where you came from and how much love I have to give.

The dresser turned changing table has a story all it's own and the top was made just for it and was a gift from my aunt. I love it. It was such a thoughtful idea and has been incredibly useful. Nice for holding burp cloths, dipes and wipes, and a few distraction toys.
The monogram was the first thing I knew I was going to put in her room. I wasn't sure where, but I knew it was going up somewhere! This is the same font we used for our wedding. That P was EVERYWHERE! If it was able to get printed it was getting a P on it! And it is the south. A monogram is expected, right?! I love the polka dots to frame it out and give it a finished look. Little Miss has an aunt that LOVES her some polka dots! I can't wait for her to see them. I think she will be excited they got incorporated somehow! The color is the same gold craft paint I used on the frames.
A small stuffed Peter Rabbit and some handbags that belonged to my great grandmother.
The view from the rocker.
Those great knobs I found at Anthropologie holding a sweet little sweater outfit that belonged to my, now (almost) 10 year old niece. It will be fun to see Little Miss in that and the other outfits her cousins wore!

So there you have it. The nursery. A nursery fit for our very own Little Miss Magic. I hope you like it! For me it is the perfect blend of old and new, frilly and suttle. A whole room that perfectly says Refresh & Repurpose!

For previous nursery post and sorces see these Pink,Frames, Sneak Peek, Gallery Wall in progress, Gallery Wall Reveal, Linens, Artwork

Monday, January 16, 2012

A Nursery Sneak Peek..Gallery Wall

The nursery has a lot of details so I will make a week of it and on Friday you can see the whole room in all it's glory. Of course, that's pretty scary because it means a lot of pressure for me. You see, the room is not quite finished. Almost, but almost doesn't count.

And I'd rather do it this way so the reveal isn't too wordy.

I am so proud of this wall. Gallery walls scare me because I feel like you are married to them. All those holes in the wall. What if you don't like it. Then it's a lot of work to repair your wall....ugh. No thanks.

When I found out we were having a girl, I wanted to do paper dolls a la Erika at Urban Grace Interiors
What's not to love?! I wanted to do them myself, but wasn't sure how to do them and change them up a bit without directly coping them.

So the plan changed to a gallery wall when we went to the Outer Banks for Labor Day and found an old Peter Rabbit book. First, I guess I should explain the Peter Rabbit connection. The furniture that is used in the nursery and a few pieces in the boys room was my grandmothers, and first her sisters! Their childhood room was called Peter Rabbits room. The furniture became Peter Rabbits furniture. So once we found the book, and decided on a gallery wall, I ran with the Peter Rabbit theme. (I love a theme. It seems to make things easier?)

Then I had to find some other inspiration. I didn't want all pictures. I wanted different textures, sizes, colors, etc. So to pinterest I went!

Once I got some inspiration I headed to the Salvation Army for some frames. Remember this post about some frames I found? Since I wanted different textures sizes etc for the artwork, I decided I would do that for the frames too. Which made shopping at the Salvation Army easy. I also decided that the color would be the thing that made them uniform.

And then I showed you the frames in progress. Some primer and $3 gold craft paint.

Here it is all finished.
Pictures 1 & 2 were inspired by this:
For some reason it's not letting me open the original site? I took a guess as to what it actually is, but I thought I would combine silhouettes and the boys artwork, so it was a project for them and something they did just for her. These two pictures consist of a $3 Walmart frame, a $2 Salvation Army frame, and 2 pieces of cardstock for $1.

Pictures 3 & 4 are the pages from the Peter Rabbit book. Two $3 frames from Salvation Army.

Picture 5 is a cross stitch I did years ago (I believe in high school) and a $1 wooden frame from Michales.

#6 is just a resin C from Ben Franklin. $1.

#7 is a Wedgewood plate from the set we were given from Chads grandmother when Q was born.
Image found here. So glad we found a great use for it. I know I should have, but there was no way, I was going to give my toddler some Wedgewood china to eat off of!

#8 was inspired by this:
Found on Pinterest but originally from here
It was super simple to do. I got a $1 embroidery hoop from Ben Franklin and used some fabric & thread I already had. I also used iron on tape to keep things from shifting while I sewed. I really think it's cute.

Picture #9 was inspired by this bunny bunting
Again, found on Pinterest but originally from here. I even used the same bunnies for a template. I made five different sizes. One for each member of our family. A $2 Salvation Army frame, $1 for 2 pieces of cardstock, and $1 for a package of pom poms. I don't know how I got this final product from the bunting. But I guess that is why it is called inspiration!

Picture 10 is one of my favorites. I love toile print. I saw this paper at Hobby Lobby and new I wanted to use it. I was originally going to use it for the five bunnies but it wasn't working out. Once I started to look at it I noticed it had two little boys and a little girl playing ring around the rosey, with a dog and a mom watching. Two little boys and a little girl!! $1 Salvation Army frame and a piece of scrapbook paper! Score!

Picture 11 is a Michaels frame I already had, some linen fabric (you'll see more of that soon) as a mat, and two pages from another antique Peter Rabbit book.

There you have it. A gallery wall for under $25 and I got to conquer my irrational fear laziness of completing one! And I'm sure way more details than you ever wanted to know!

For previous nursery post see these Pink,Frames, Sneak Peek, Gallery Wall in progress

Check back tomorrow night for Tuesdays reveal!

Wednesday, January 4, 2012